Serverless applications are becoming increasingly popular among developers. They provide a cost-effective and efficient way to handle application logic and data storage. Two of the most popular technologies that can be used together to build serverless applications are Google Cloud Functions and MongoDB Atlas.
Google Cloud Functions allows developers to run their code in response to events, such as changes in data or HTTP requests, without having to manage the underlying infrastructure. This makes it easy to build scalable and performant applications. MongoDB Atlas, on the other hand, provides a fully-managed, globally-distributed, and highly-available data platform. This makes it easy for developers to store and manage their data in a reliable and secure way.
In this article, we’ll discuss three best practices for working with databases in Google Cloud Functions. First, we’ll explore the benefits of opening database connections in the global scope. Then, we’ll cover how to make your database operations idempotent to ensure data consistency in event-driven functions. Finally, we’ll discuss how to set up a secure network connection to protect your data from unauthorized access. By following these best practices, you can build more reliable and secure event-driven functions that work seamlessly with your databases.
Prerequisites
The minimal requirements for following this tutorial are:
- A MongoDB Atlas database with a database user and appropriate network configuration.
- A Google Cloud account with billing enabled.
- Cloud Functions, Cloud Build, Artifact Registry, Cloud Run, Logging, and Pub/Sub APIs enabled. Follow this link to enable the required APIs.
You can try the experiments shown in this article yourself. Both MongoDB Atlas and Cloud Functions offer a free tier which are sufficient for the first two examples. The final example — setting up a VPC network or Private Service Connect — requires setting up a paid, dedicated Atlas database and using paid Google Cloud features.
Open database connections in the global scope
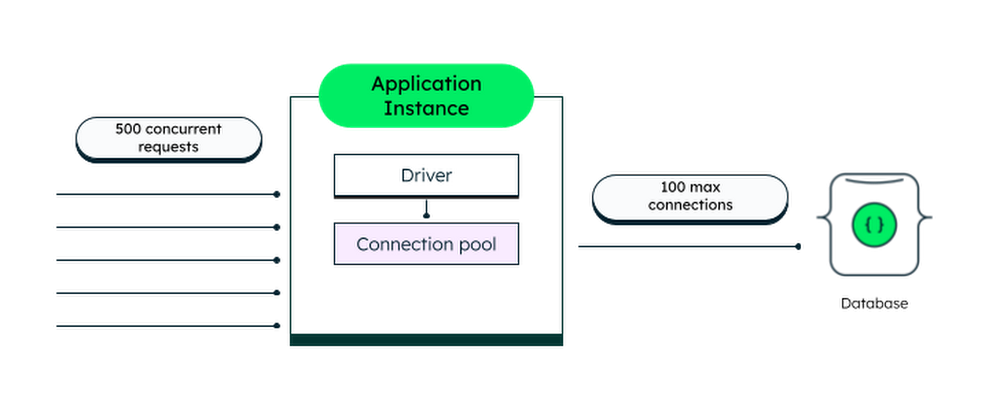
Let’s say that we’re building a traditional, self-hosted application that connects to MongoDB. We could open a new connection every time we need to communicate with the database and then immediately close that connection. But opening and closing connections adds an overhead both to the database server and to our app. It’s far more efficient to reuse the same connection every time we send a request to the database. Normally, we’d connect to the database using a MongoDB driver when we start the app, save the connection to a globally accessible variable, and use it to send requests. As long as the app is running, the connection will remain open.
To be more precise, when we connect, the MongoDB driver creates a connection pool. This allows for concurrent requests to communicate with the database. The driver will automatically manage the connections in the pool, creating new ones when needed and closing them when they’re idle. The pooling also limits the number of connections that can come from a single application instance (100 connections is the default).
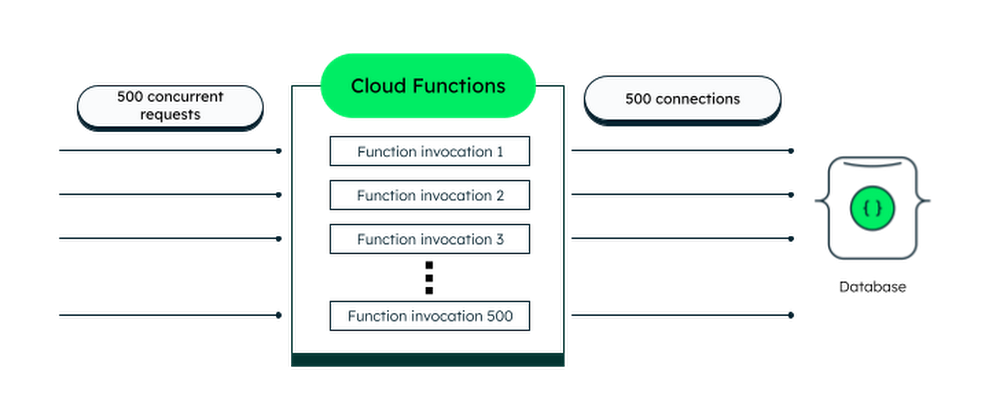
On the other hand, Cloud Functions are serverless. They’re very efficient at automatically scaling up when multiple concurrent requests come in, and down when the demand decreases.
By default, each function instance can handle only one request at a time. However, with Cloud Functions 2nd gen, you can configure your functions to handle concurrent requests. For example, if you set the concurrency parameter to 10, a single function instance will be able to work on a max of 10 requests at the same time. If we’re careful about how we connect to the database, the requests will take advantage of the connection pool created by the MongoDB driver. In this section, we’ll explore specific strategies for reusing connections.
By default, Cloud Functions can spin up to 1,000 new instances. However, each function instance runs in its own isolated execution context. This means that instances can’t share a database connection pool. That’s why we need to pay attention to the way we open database connections. If we have our concurrency parameter set to 1 and we open a new connection with each request, we will cause unnecessary overhead to the database or even hit the maximum connections limit.
That looks very inefficient! Thankfully, there’s a better way to do it. We can take advantage of the way Cloud Functions reuses already-started instances.
We mentioned earlier that Cloud Functions scale by spinning up new instances to handle incoming requests. Creating a brand new instance is called a “cold start” and involves the following steps:
- Loading the runtime environment.
- Executing the global (instance-wide) scope of the function.
- Executing the body of the function defined as an “entry point.”
When the instance handles the request, it’s not closed down immediately. If we get another request in the next few minutes, chances are high it will be routed to the same, already “warmed” instance. But this time, only the “entry point” function will be invoked. And what’s more important is that the function will be invoked in the same execution environment. Practically, this means that everything we defined in the global scope can be reused — including a database connection! This will reduce the overhead of opening a new connection with every function invocation.
While we can take advantage of the global scope for storing a reusable connection, there is no guarantee that a reusable connection will be used.
Let’s test this theory! We’ll do the following experiment:
- We’ll create two Cloud Functions that insert a document into a MongoDB Atlas database. We’ll also attach an event listener that logs a message every time a new database connection is created.
- The first function will connect to Atlas in the function scope.
- The second function will connect to Atlas in the global scope.
- We’ll send 50 concurrent requests to each function and wait for them to complete. In theory, after spinning up a few instances, Cloud Functions will reuse them to handle some of the requests.
- Finally, we’ll inspect the logs to see how many database connections were created in each case.
Before starting, go back to your Atlas deployment and locate your connection string. Also, make sure you’ve allowed access from anywhere in the network settings. Instead of this, we strongly recommend establishing a secure connection.
Creating the Cloud Function with function-scoped database connection
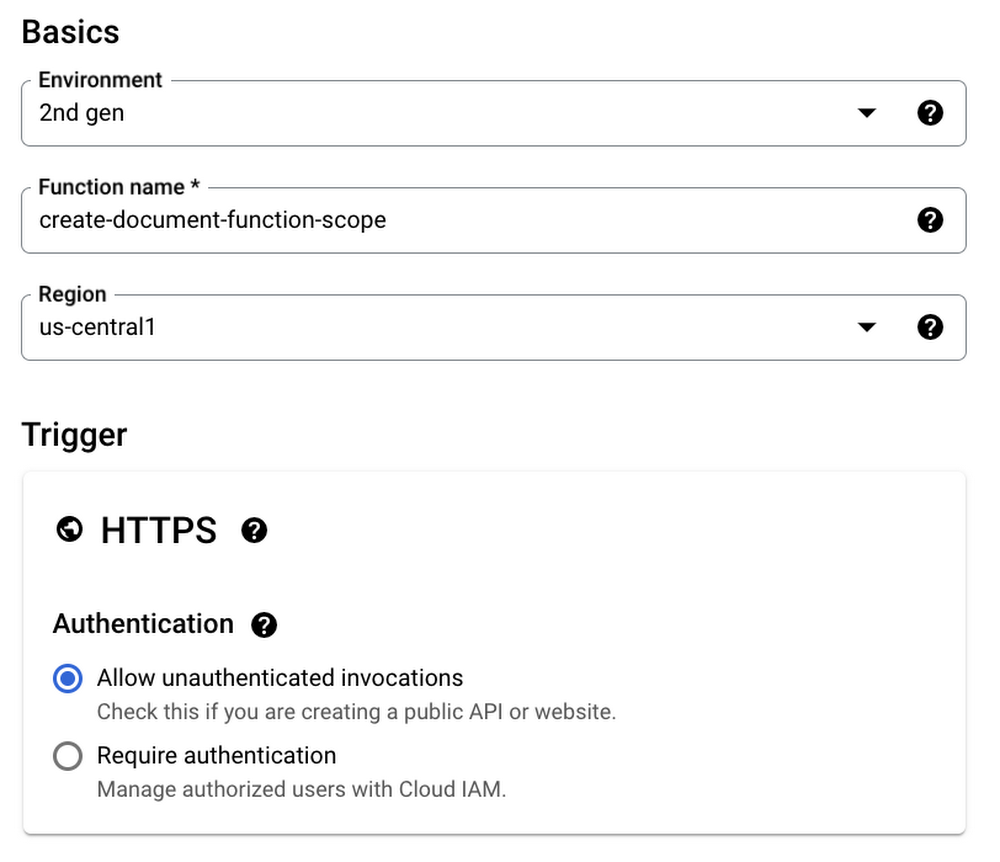
We’ll use the Google Cloud console to conduct our experiment. Navigate to the Cloud Functions page and make sure you’ve logged in, selected a project, and enabled all required APIs. Then, click on Create function and enter the following configuration:
- Environment: 2nd gen
- Function name: create-document-function-scope
- Region: us-central-1
- Authentication: Allow unauthenticated invocations
Expand the Runtime, build, connections and security settings section and under Runtime environment variables, add a new variable ATLAS_URI with your MongoDB Atlas connection string. Don’t forget to replace the username and password placeholders with the credentials for your database user.
> Instead of adding your credentials as environment variables in clear text, you can easily store them as secrets in Secret Manager. Once you do that, you’ll be able to access them from your Cloud Functions.
Click Next. It’s time to add the implementation of the function. Open the `package.json` file from the left pane and replace its contents with the following:
- code_block
- [StructValue([(u’code’, u'{rn “dependencies”: {rn “@google-cloud/functions-framework”: “^3.0.0”,rn “mongodb”: “latest”rn }rn}’), (u’language’, u’lang-py’), (u’caption’, <wagtail.wagtailcore.rich_text.RichText object at 0x3ece892a0c10>)])]
We’ve added the `mongodb` package as a dependency. The package is used to distribute the MongoDB Node.js driver that we’ll use to connect to the database.
Now, switch to the `index.js` file and replace the default code with the following:
- code_block
- [StructValue([(u’code’, u”// Global (instance-wide) scopern// This code runs once (at instance cold-start)rnconst { http } = require(‘@google-cloud/functions-framework’);rnconst { MongoClient } = require(‘mongodb’);rnrnhttp(‘createDocument’, async (req, res) => {rn // Function scopern // This code runs every time this function is invokedrn const client = new MongoClient(process.env.ATLAS_URI);rn client.on(‘connectionCreated’, () => {rn console.log(‘New connection created!’);rn });rnrn // Connect to the database in the function scopern try {rn await client.connect();rnrn const collection = client.db(‘test’).collection(‘documents’);rnrnrn const result = await collection.insertOne({ source: ‘Cloud Functions’ });rnrn if (result) {rn console.log(`Document ${result.insertedId} created!`);rn return res.status(201).send(`Successfully created a new document with id ${result.insertedId}`);rn } else {rn return res.status(500).send(‘Creating a new document failed!’);rn }rn } catch (error) {rn res.status(500).send(error.message);rn }rn});”), (u’language’, u’lang-py’), (u’caption’, <wagtail.wagtailcore.rich_text.RichText object at 0x3ece7fc82f50>)])]
Make sure the selected runtime is Node.js 16 and for entry point, replace helloHttp with createDocument.
Finally, hit Deploy.
Creating the Cloud Function with globally-scoped database connection
Go back to the list with functions and click Create function again. Name the function create-document-global-scope. The rest of the configuration should be exactly the same as in the previous function. Don’t forget to add an environment variable called ATLAS_URI for your connection string. Click Next and replace the `package.json` contents with the same code we used in the previous section. Then, open `index.js` and add the following implementation:
- code_block
- [StructValue([(u’code’, u”// Global (instance-wide) scopern// This code runs once (at instance cold-start)rnconst { http } = require(‘@google-cloud/functions-framework’);rnconst { MongoClient } = require(‘mongodb’);rnrn// Use lazy initialization to instantiate the MongoDB client and connect to the databasernlet client;rnasync function getConnection() {rn if (!client) {rn client = new MongoClient(process.env.ATLAS_URI);rn client.on(‘connectionCreated’, () => {rn console.log(‘New connection created!’);rn });rnrn // Connect to the database in the global scopern await client.connect();rn }rnrn return client;rn}rnrnhttp(‘createDocument’, async (req, res) => {rn // Function scopern // This code runs every time this function is invokedrn const connection = await getConnection();rn const collection = connection.db(‘test’).collection(‘documents’);rnrn try {rn const result = await collection.insertOne({ source: ‘Cloud Functions’ });rnrn if (result) {rn console.log(`Document ${result.insertedId} created!`);rn return res.status(201).send(`Successfully created a new document with id ${result.insertedId}`);rn } else {rn return res.status(500).send(‘Creating a new document failed!’);rn }rn } catch (error) {rn res.status(500).send(error.message);rn }rn});”), (u’language’, u’lang-py’), (u’caption’, <wagtail.wagtailcore.rich_text.RichText object at 0x3ece6b118a90>)])]
Change the entry point to createDocument and deploy the function.
As you can see, the only difference between the two implementations is where we connect to the database. To reiterate:
- The function that connects in the function scope will create a new connection on every invocation.
- The function that connects in the global scope will create new connections only on “cold starts,” allowing for some connections to be reused.
Let’s run our functions and see what happens! Click Activate Cloud Shellat the top of the Google Cloud console. Execute the following command to send 50 requests to the create-document-function-scope function:
- code_block
- [StructValue([(u’code’, u’seq 50 | xargs -Iz -n 1 -P 50 \rn gcloud functions call \rn create-document-function-scope \rn –region us-central1 \rn –gen2′), (u’language’, u”), (u’caption’, <wagtail.wagtailcore.rich_text.RichText object at 0x3ece6b1238d0>)])]
You’ll be prompted to authorize Cloud Shell to use your credentials when executing commands. Click Authorize. After a few seconds, you should start seeing logs in the terminal window about documents being created. Wait until the command stops running — this means all requests were sent.
Then, execute the following command to get the logs from the function:
- code_block
- [StructValue([(u’code’, u’gcloud functions logs read \rn create-document-function-scope \rn –region us-central1 \rn –gen2 \rn –limit 500 \rn | grep “New connection created”‘), (u’language’, u”), (u’caption’, <wagtail.wagtailcore.rich_text.RichText object at 0x3ece6b123e10>)])]
We’re using `grep` to filter only the messages that are logged whenever a new connection is created. You should see that a whole bunch of new connections were created!
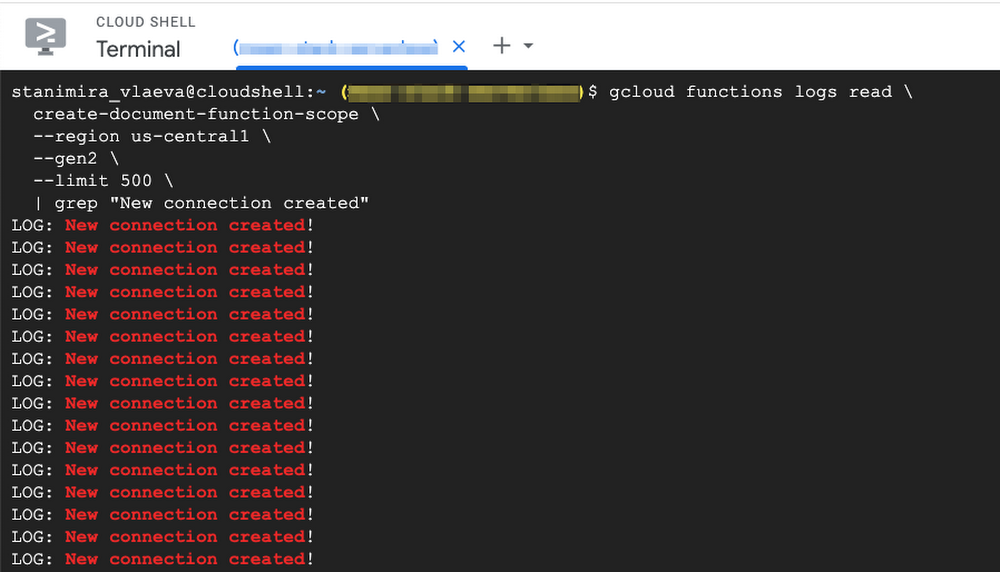
We can count them with the `wc -l` command:
- code_block
- [StructValue([(u’code’, u’gcloud functions logs read \rn create-document-function-scope \rn –region us-central1 \rn –gen2 \rn –limit 500 \rn | grep “New connection created” \rn | wc -l’), (u’language’, u”), (u’caption’, <wagtail.wagtailcore.rich_text.RichText object at 0x3ece6b1235d0>)])]
You should see the number 50 printed in the terminal window. This confirms our theory that a connection is created for each request.
Let’s repeat the process for the create-document-global-scope function.
- code_block
- [StructValue([(u’code’, u’seq 50 | xargs -Iz -n 1 -P 50 \rn gcloud functions call \rn create-document-global-scope \rn –region us-central1 \rn –gen2′), (u’language’, u”), (u’caption’, <wagtail.wagtailcore.rich_text.RichText object at 0x3ece6b123bd0>)])]
You should see log messages about created documents again. When the command’s finished, run:
- code_block
- [StructValue([(u’code’, u’gcloud functions logs read \rn create-document-global-scope \rn –region us-central1 \rn –gen2 \rn –limit 500 \rn | grep “New connection created”‘), (u’language’, u”), (u’caption’, <wagtail.wagtailcore.rich_text.RichText object at 0x3ece6b123450>)])]
This time, you should see significantly fewer new connections. You can count them again with `wc -l`. We have our proof that establishing a database connection in the global scope is more efficient than doing it in the function scope.
We noted earlier that increasing the number of concurrent requests for a Cloud Function can help alleviate the database connections issue. Let’s expand a bit more on this.
Concurrency with Cloud Functions 2nd gen and Cloud Run
By default, Cloud Functions can only process one request at a time. However, Cloud Functions 2nd gen are executed in a Cloud Run container. Among other benefits, this allows us to configure our functions to handle multiple concurrent requests. Increasing the concurrency capacity brings Cloud Functions closer to a way traditional server applications communicate with a database.
If your function instance supports concurrent requests, you can also take advantage of connection pooling. As a reminder, the MongoDB driver you’re using will automatically create and maintain a pool with connections that concurrent requests will use.
Depending on the use case and the amount of work your functions are expected to do, you can adjust:
- The concurrency settings of your functions.
- The maximum number of function instances that can be created.
- The maximum number of connections in the pool maintained by the MongoDB driver.
And as we proved, you should always declare your database connection in the global scope to persist it between invocations.
Make your database operations idempotent in event-driven functions
You can enable retrying for your event-driven functions. If you do that, Cloud Functions will try executing your function again and again until it completes successfully or the retry period ends.
This functionality can be useful in many cases, namely when dealing with intermittent failures. However, if your function contains a database operation, executing it more than once can create duplicate documents or other undesired results.
Let’s consider the following example: The function store-message-and-notify is executed whenever a message is published to a specified Pub/Sub topic. The function saves the received message as a document in MongoDB Atlas and then uses a third-party service to send an SMS. However, the SMS service provider frequently fails and the function throws an error. We have enabled retries, so Cloud Functions tries executing our function again. If we weren’t careful with the implementation, we could duplicate the message in our database.
How do we handle such scenarios? How do we make our functions safe to retry? We have to ensure that the function is idempotent. Idempotent functions produce exactly the same result regardless of whether they were executed once or multiple times. If we insert a database document without a uniqueness check, we make the function non-idempotent.
Let’s give this scenario a try.
Creating the event-driven non-idempotent Cloud Function
Go to Cloud Functions and start configuring a new function:
- Environment: 2nd gen
- Function name: store-message-and-notify
- Region: us-central-1
- Authentication: Require authentication
Then, click on Add Eventarc Trigger and select the following in the opened dialog:
- Event provider: Cloud Pub/Sub
- Event: google.cloud.pubsub.topic.v1.messagePublished
Expand Select a Cloud Pub/Sub topic and then click Create a topic. Enter test-topic for the topic ID, and then Create topic.
Finally, enable Retry on failure and click Save trigger. Note that the function will always retry on failure even if the failure is caused by a bug in the implementation.
Add a new environment variable called ATLAS_URI with your connection string and click Next.
Replace the `package.json` with the one we used earlier and then, replace the `index.js` file with the following implementation:
- code_block
- [StructValue([(u’code’, u”const { cloudEvent } = require(‘@google-cloud/functions-framework’);rnconst { MongoClient } = require(‘mongodb’);rnrn// Use lazy initialization to instantiate the MongoDB client and connect to the databasernlet client;rnasync function getConnection() {rn if (!client) {rn client = new MongoClient(process.env.ATLAS_URI);rn await client.connect();rn }rnrn return client;rn}rnrncloudEvent(‘processMessage’, async (cloudEvent) => {rn let message;rn try {rn const base64message = cloudEvent?.data?.message?.data;rn message = Buffer.from(base64message, ‘base64’).toString();rn } catch (error) {rn console.error(‘Invalid message’, cloudEvent.data);rn return Promise.resolve();rn }rnrn try {rn await store(message);rn } catch (error) {rn console.error(error.message);rn throw new Error(‘Storing message in the database failed.’);rn }rnrn if (!notify()) {rn throw new Error(‘Notification service failed.’);rn }rn});rnrnasync function store(message) {rn const connection = await getConnection();rn const collection = connection.db(‘test’).collection(‘messages’);rn await collection.insertOne({rn text: messagern });rn}rnrn// Simulate a third-party service with a 50% fail raternfunction notify() {rn return Math.floor(Math.random() * 2);rn}”), (u’language’, u’lang-py’), (u’caption’, <wagtail.wagtailcore.rich_text.RichText object at 0x3ece6b123c50>)])]
Then, navigate to the Pub/Sub topic we just created and go to the Messages tab. Publish a few messages with different message bodies.
Navigate back to your Atlas deployments. You can inspect the messages stored in the database by clicking Browse Collectionsin your cluster tile and then selecting the test database and the messages collection. You’ll notice that some of the messages you just published are duplicated. This is because when the function is retried, we store the same message again.
One obvious way to try to fix the idempotency of the function is to switch the two operations. We could execute the `notify()` function first and then, if it succeeds, store the message in the database. But what happens if the database operation fails? If that was a real implementation, we wouldn’t be able to unsend an SMS notification. So, the function is still non-idempotent. Let’s look for another solution.
Using the event ID and unique index to make the Cloud Function idempotent
Every time the function is invoked, the associated event is passed as an argument together with an unique ID. The event ID remains the same even when the function is retried. We can store the event ID as a field in the MongoDB document. Then, we can create a unique index on that field. That way, storing a message with a duplicate event ID will fail.
Connect to your database from the MongoDB Shell and execute the following command to create a unique index:
- code_block
- [StructValue([(u’code’, u’db.messages.createIndex({ “event_id”: 1 }, { unique: true })’), (u’language’, u’lang-py’), (u’caption’, <wagtail.wagtailcore.rich_text.RichText object at 0x3ece6b1230d0>)])]
Then, click on Edit in your Cloud Function and replace the implementation with the following:
- code_block
- [StructValue([(u’code’, u”const { cloudEvent } = require(‘@google-cloud/functions-framework’);rnconst { MongoClient } = require(‘mongodb’);rnrn// Use lazy initialization to instantiate the MongoDB client and connect to the databasernlet client;rnasync function getConnection() {rn if (!client) {rn client = new MongoClient(process.env.ATLAS_URI);rn await client.connect();rn }rnrn return client;rn}rnrncloudEvent(‘processMessage’, async (cloudEvent) => {rn let message;rn try {rn const base64message = cloudEvent?.data?.message?.data;rn message = Buffer.from(base64message, ‘base64’).toString();rn } catch (error) {rn console.error(‘Invalid message’, cloudEvent.data);rn return Promise.resolve();rn }rnrn try {rn await store(cloudEvent.id, message);rn } catch (error) {rn // The error E11000: duplicate key error for the ‘event_id’ field is expected when retryingrn if (error.message.includes(‘E11000’) && error.message.includes(‘event_id’)) {rn console.log(‘Skipping retrying because the error is expected…’);rn return Promise.resolve();rn }rn rn console.error(error.message);rn throw new Error(‘Storing message in the database failed.’);rn }rnrn if (!notify()) {rn throw new Error(‘Notification service failed.’);rn }rn});rnrnasync function store(id, message) {rn const connection = await getConnection();rn const collection = connection.db(‘test’).collection(‘messages’);rn await collection.insertOne({rn event_id: id,rn text: messagern });rn}rnrn// Simulate a third-party service with a 50% fail raternfunction notify() {rn return Math.floor(Math.random() * 2);rn}”), (u’language’, u’lang-py’), (u’caption’, <wagtail.wagtailcore.rich_text.RichText object at 0x3ece6b58ce90>)])]
Go back to the Pub/Sub topic and publish a few more messages. Then, inspect your data in Atlas, and you’ll see the new messages are not getting duplicated anymore.
There isn’t a one-size-fits-all solution to idempotency. For example, if you’re using update operations instead of insert, you might want to check out the `upsert` option and the `$setOnInsert` operator.
Set up a secure network connection
To ensure maximum security for your Atlas cluster and Google Cloud Functions, establishing a secure connection is imperative. Fortunately, you have several options available through Atlas that allow us to configure private networking.
One such option is to set up Network Peering between the MongoDB Atlas database and Google Cloud. Alternatively, you can create a private endpoint utilizing Private Service Connect. Both of these methods provide robust solutions for securing the connection.
It is important to note, however, that these features are not available for use with the free Atlas M0 cluster. To take advantage of these enhanced security measures, you will need to upgrade to a dedicated cluster at the M10 tier or higher.
Wrap-up
In conclusion, Cloud Functions and MongoDB Atlas are a powerful combination for building efficient, scalable, and cost-effective applications. By following the best practices outlined in this article, you can ensure that your application is robust, performant, and able to handle any amount of traffic. From using proper indexes to securing your network, these tips will help you make the most of these two powerful tools and build applications that are truly cloud-native. So start implementing these best practices today and take your cloud development to the next level! If you haven’t already, you can subscribe to MongoDB Atlas and create your first free cluster right from the Google Cloud marketplace.